 | Tips and Tricks page |  |
 Tips and Tricks In this section, we give advice with the technical side on how to repair or fit the items
we sell. This is regularly updated, so if you have any information that might help someone, please email chris@vacuumcleanersparesuk.co.uk
How to fit a Belt on a Dyson Dco4 Clutch Type: ( Not Silver and Lime)
To replace the belts on the dco4 clutch model
1 remove brush roll
2 remove the control knob,
this can be done by pressing down the hidden locating catches ,
one is located adjacent, to and inline with the large dot on the
control knob, and the pressing can be achieved by inserting a thin screwdriver blade into the
groove next to the dot, this releases the top catch, the other catch can be located directly opposite on the underside,again insert the screwdriver as detailed above, the knob can be completely removed, and now the clutch can be removed and dismantled with standard engineering tools, great care must be taken to replace all components in order as they came off this will ease re-assembly, good luck, The Support Team .
| Prestige Pressure cooker tips and tricks Presure Cooker Gaskets , Always check the gasket's condition after each use ensuring it has not become hard or developed cracks. In normal use it will need replacing every 6-9 months. Frequent usage will necessitate sooner replacement
Valves ..The 'Pintle' in the Ready to Serve indicator is designed to rise when the cooking cycle has begun, and drop when the lid can be removed.
It also acts as a safety valve giving three separate levels of safety protection. Ensure the 'Pintle' valve moves freely and the rubber seal is fitted the right way up. Always refer yo your instruction booklet
| Prestige ValvesPrestigePresure Cooker Valves ..The 'Pintle' in the Ready to Serve indicator is designed to rise when the cooking cycle has begun, and drop when the lid can be removed.
It also acts as a safety valve giving three separate levels of safety protection. Ensure the 'Pintle' valve moves freely and the rubber seal is fitted the right way up. Always refer yo your instruction booklet | 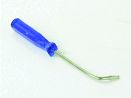 REPLACING FLEX OR SWITCH ON DCO4 Important: In the interests of personal safety, Qualtex do not recommend either the switch or the mains lead to be sold to the general public. They both require specialist knowledge and the use of a small leverage tool before either can be replaced. For engineers not familiar with the access procedure, the following tips may be useful.
1) At the time of writing, the special leverage tool to release the ON/OFF switch knob is not generally available. Qualtex therefore commissioned the manufacture of a suitable tool. This takes the form of a regulated size screwdriver, Part No: mis121. Bent at 90 degrees at a specific point along the blade length.
| 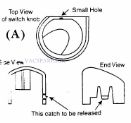 SWITCH TOOL 2) Referring to Sketch (A), there is adjacent to the ON/OFF knob, a small hole. If one inserts the screwdriver into this hole it only requires a little practise and careful leverage for the catch to be released, which locates the knob, and the knob can be lifted off. It is then a simple matter to replace either the switch or the mains lead.
3) Important: Treat the Switch Knob with care when releasing the catch as it easly broken |
|
|


